Recently I made a DIY Ball Python incubator that maintained more stable temperatures than most professional models, but at half the price. If you want to build your own, then this step-by-step guide is worth a look…
To incubate Ball Python eggs, you need a stable, safe incubator. This means one that holds temperatures well, without big fluctuations. Unfortunately, professional models can be pricey, so in this article we’ll look at how to build your own DIY Ball Python incubator in a day.
How to incubate Ball Python eggs
Ball Pythons eggs are relatively hardy, soft-shelled eggs whose incubation temperature does not determine the sex of the hatchlings.
In species with eggs like this, there tends to be an optimum temperature and humidity range for hatch rate and hatchling survival rate. With Ball Pythons, this seems to be a temperature of 88-92°F/31-33°C and humidity of 95-99%. To incubate Ball Python eggs, these parameters should be nice and stable.
Moreover, just because they can be hatched anywhere withing a certain range, it doesn’t mean the temperature can fluctuate within that range during incubation! From my experience, regular temperature fluctuations are the single most common cause of bad hatch rate and should be avoided at all costs.
In an eggshell (get it? Instead of a nutshell…) temperature is everything! You need your temperatures to be not just ideal, but stable over a long period.
The aim of this post is to tell you how to make an incubator that will be as stable as possible, and large enough to incubate 2 to 4 Ball Python clutches, or many more smaller reptile clutches.
Supply list
*WARNING: some newer models of fridge and wine cooler have something called “gas-blown insulation”. This is often foam blown with gases like cyclopentane. It may be toxic to reptiles and their eggs! If you think a fridge, wine cooler or freezer has this in it – or you aren’t sure – do not use it for a DIY incubator. In general there will be a sticker stating what the “blowing agent” was if this kind of insulation is present.
First, you need to get all the necessary supplies. Some of these are interchangeable with similar products – so don’t worry if you have a heat mat instead of a heat cable, for example.
Also, I’ve used a wine cooler with a glass door, but any fridge or wine cooler will work. The most important thing is that the seal around the door is still good. It must not let air in and out when closed!
The one thing you cannot compromise on however is a good quality, pulse proportional thermostat. ON/OFF thermostats (often called Mat Stats or Mini Stats) and dimming thermostats do not work as well for incubators!
- Wine cooler – this one is 32 x 18 x 18in/81 x 46 x 46cm
- A 50-watt Heat cable (Zoomed in this case) or 24in/60cm heat strip or mat. Whatever you use, buy a good, respected brand. It must be safe!
- Pulse proportional thermostat with a at least a 100-watt capacity. Here I’ve used a Habistat 600 watt.
- One or two 120mm USB computer fans. I suggest ordering two in case you need both.
- A USB-to-socket adapter for the fan. This will be plugged into the socket – not into the thermostat.
- Some 80mm x 4mm screws.
- Some 30mm hard plastic spacers.
- An average quality power drill.
- Aquarium sealant/ aquarium-safe silicone.
- Small water bottles.
- Two plastic tubs.
- Two Digital Thermometers.
- Some incubation medium.
- Some eggs! Well, eventually…
How to build a DIY Ball Python incubator in 10 steps
1. Prepare the Wine Cooler
Remove anything inside the cooler that you will not need. Extra trays etc can all go. Some people remove the motor from the back, but if it isn’t taking up any room on the inside then don’t bother.
After you’ve decided what stays, clean the inside with a solution of warm water and dish soap/ washing up liquid. Make sure no traces of mould or other contaminants are left. Do not use any kind of bleach or disinfectant.
This might sound a little paranoid, but I don’t like disinfectant or bleach to be used anywhere near an incubator. These products are made to kill things, the exact opposite of what we’re trying to do here.
2. Drill a hole for the thermostat probe
Drill a hole near the top of the back wall and put the thermostat probe through, leaving the main unit on the outside. When in place, the probe should be in mid-air, away from any heat element. It should not be touching anything either.
When you’re happy with its placement, fill silicone around it and let it dry for a few hours until it’s set firm. If you make a first hole and aren’t happy with it, just fill it in with silicone – no big deal.
After this is done, I usually place the main thermostat unit on top of the incubator, or screw it to the side. Either way, make sure it’s somewhere the controls won’t be knocked accidentally.
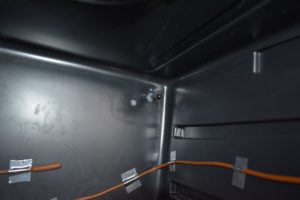
3. Drill a hole for the heating element power cord
I suggest a spot near the bottom of the cooler. Feed the power cord out through the hole, then set it in place with the aquarium sealant. Leave it to set firmly before the next step.
4. Line the back and sides of the cooler with your heating element
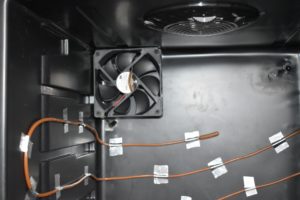
I use metal tape (aluminium insulating adhesive tape) for this. If it is a heat cable you’re using, you can attach it to the middle and lower walls of the cooler, like in the photo. Be careful to maintain a good 2in/5cm space between the lengths of the cable. If they touch, they could overheat.
If using a heat strip or heat mat, you can attach it running down the back of cooler. Use the metal tape to attach the sides – do not cover the whole mat with tape as again, this could cause overheating.
Whichever heating element you decide on, make sure that it does not touch the trays, or interfere with them being taken out.

5. Prepare your plastic tubs for testing
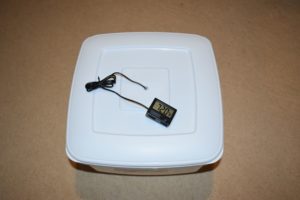
For these tubs you should have chosen a pair of nice, firmly sealing containers that are big enough for the clutches you’re expecting. Remember that they need to be air-tight to stop your eggs drying out. Don’t worry, when you open the egg box (briefly) once in a while to check on them it gives them enough oxygen.
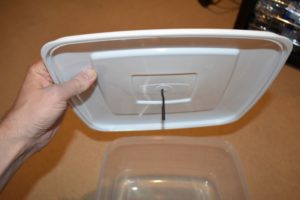
Cut a small hole in the centre of the lid of each tub and place your digital thermometer probe through it. The probe should be hanging in mid-air inside the tub – just like the thermostat probe earlier. Once the probe is in place, seal the hole around it with non-toxic tape or aquarium sealant.
Remember that if you seal the probe in place, it’s a good idea to have a spare tub with the same lid on hand during the incubation period. This allows you to replace the lid and thermometer together if your original thermometer stops working.
Some people also fit their tubs with hygrometers, but I find these are often wildly inaccurate and don’t always use them. If your eggs dimple early, then this is usually the best sign you need to up the humidity by added a little filtered water.
6. Fill the bottom of the incubator with water bottles
This step is simple but has two incredibly important functions. First, the water in the bottles absorbs heat, and helps maintain it if there is ever a power cut. This means they could literally save your eggs in the event of a major storm!
The second function that is less often talked about is to take up space. That space at the bottom is awkward to use, and leaving it empty just makes for more air to heat. Once the water is up to temperature, it holds heat better than air. This makes things easier on your heating element, and your electricity bill…
7. Decide on the placement of your computer fan and test it
This part is extremely important as the fan will create air circulation and even out temperatures between the top and bottom shelves. Without a fan, you will end up with not only uneven temperatures, but the possibility for warm spots or unrepresentative thermostat readings.
To test your fan, place screws through the plastic spacers and into the wall of the incubator to hold it in place. The spacers will allow air to enter the fan from behind.
For this cooler, I eventually found that one fan was enough, but for anything larger you would need at least two fans.
As far as placement goes, in an incubator this size a fan on the ceiling pointing down, or on the back wall facing forward seems to work well. You want to aim for a difference between shelves of only 1-2°F/0.5-1.1°C. Place one of the plastic tubs on each shelf to test this. Keep the fan and heat element running for at least 4 hours to get a good reading.
With my fan placed on the back wall and facing forwards, I eventually got the temperature difference down to 0.5°F/0.3°C after 12 hours. This would allow me to incubate clutches at 89.5°F/31.9°C on the top shelf and 89°F/31.6°C on the lower shelf. Both would be within the optimum range.
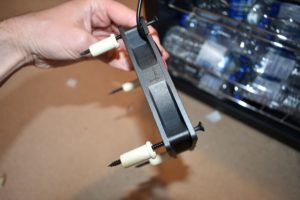
8. Drill a hole for the fan power cord
When you’re happy with the fan placement, drill a hole through the wall or back of the incubator and feed the fan power cable out through it. Fix it in place with the aquarium sealant and leave to set until firm.
9. Do one last check for holes!
If you’re anything like me, you’ve changed your mind about the placement of the trays, thermostat probe and fan about fifty times by now and drilled holes all over the place.
The problem is that these holes can let precious heat escape! Before going any further, check the interior for any holes and fill them in with aquarium sealant.
10. Begin final testing
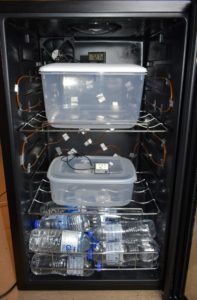
You should now have your thermostat, heating element and fan securely in place and thoroughly tested. Now for the grand finale…
Place a tub on each shelf with some incubation medium in and fire it up! You’ve already done some testing but this time I want you to test the incubator for a full 48hrs, with everything in it. This is the only way to test how it will behave when you get a clutch.
With this final test, what we’re looking for is stability. If there are no holes missed, and you placed it in a room with a constant temperature, then the incubator should maintain a stable temperature throughout.
Ideally, we don’t want an incubator that has temperature fluctuations of more than 0.5°F/0.3°C over a 48hr period.
In Conclusion
This post should give you a good idea of how to build a safe, stable incubator for 2 to 4 Ball Python clutches. The incubator I’ve made isn’t the prettiest to look at, but it maintains the correct temperature, and keeps it even across both shelves.
When building your own incubator, this should be your main goal: stability. Temperature fluctuations are the worst thing for reptile eggs! Don’t worry about how good it looks, or what other people do – just focus on testing until you get that stability.
On a side note, while most Ball Python eggs tend to survive occasional minor fluctuations, the eggs of some other species do not. If building an incubator for Green Tree Python (Morelia viridis) eggs, or those of other rainforest species, I suggest extending the final testing period from 48hours to a whole week. Better safe than sorry!
As always, get in touch via the Contact page or in the comments to let me know what you think. If you need more advice on incubating Ball Python eggs, I suggest visiting the forum at Ball-pythons.net or other posts on this website.
Disclaimer
I am not an electrician! Please ensure that you check the capacity of any equipment that you use and contact the manufacturers before using it for this purpose. If you have any doubts, contact a qualified electrician for advice. If you are under 18, please only use electrical goods with adult supervision. Ballpythonbreeder.co.uk takes no responsibility for any accidents incurred while following instructions in this post.
Also on this topic:
- Ball Python egg incubation guide
- How many eggs do Ball Pythons lay?
- Do female Ball Pythons lay eggs without a male?
For more on Ball Python eggs:
Back to the Ball Python eggs and incubation page
